Issue
Receive
Reserve
Cancel
Reservation
Cancel
old Issue
Issue
This menu is used for issuing videos to the customer. Procedure is given
below. Click on the Issue menu on Rentals or press I key on key board.
The widow will be displayed as shown in Fig 54.
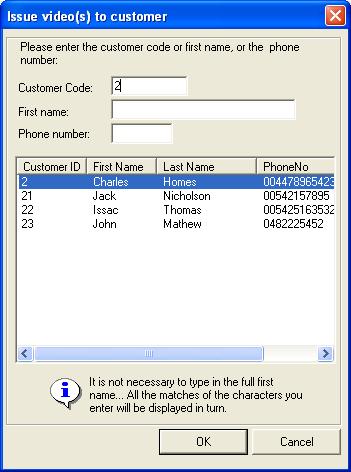
Fig 54. Issue Videos to Customer
Please type any of the three
details. If you get the customer code, name or phone number specify it in the
appropriate box. During the typing, you can see the matching details. Select
the customer details you want. Click OK or press enter.
Then a window will appear as shown in Fig 55.
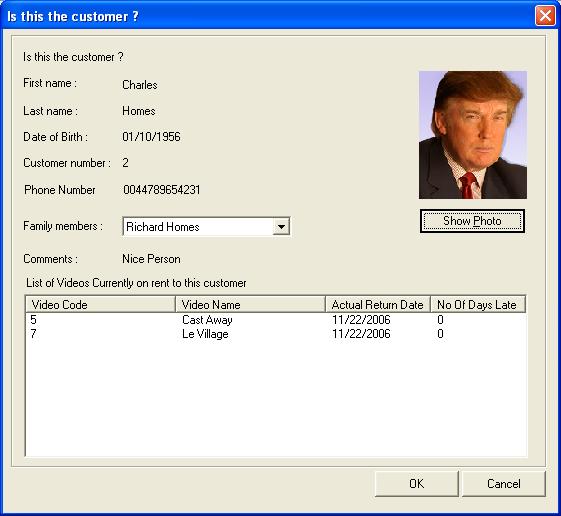
Fig 55. Confirming a Customer
A confirmation dialog box will appear. It will help you to confirm
the customer. If the selection is wrong you can cancel it, else click OK or
press Enter. If the customer made
any due returns, a message will display to inform you that this customer made
due return. If you do not want to issue video, click Cancel, else click OK to
continue. If the customer did any
reservation, VideoManager will notify you by displaying a message. If you want
to list reserved videos, click or press Enter or Yes button else choose No
button.
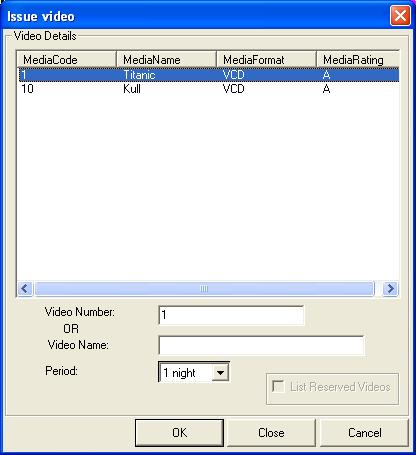
Fig 56. Selecting a Video for Issue
To select the videos, specify the
number or name of the video. You can see the matching videos on each keystroke.
Select the video you want. Specify number of days of rental in the period.
Click on OK button or press Enter to select the video. A message will
display to ask about the next selection. If the customer took more than one
video click Yes or press Enter for next selection. The window that is
closed will display again. You can select the video as written above.
If the video selection is completed press No.
Now you can enter in to the payment session. The window will
be displayed as shown in Fig 57.
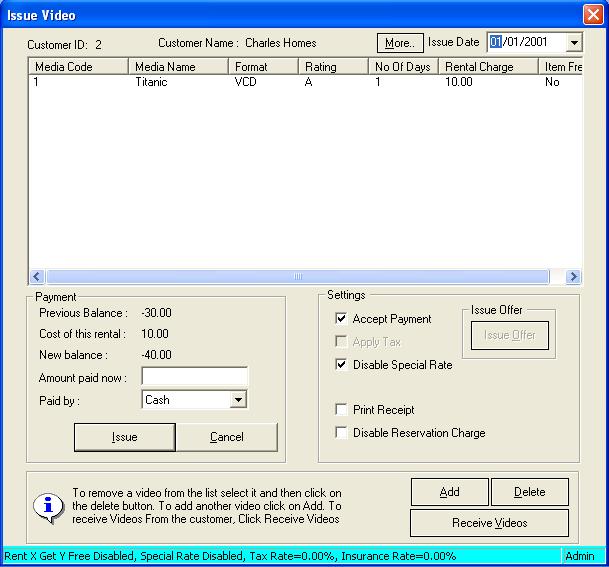
Fig
57. Making the Payment
Top of this window
will display the details of customer who took the videos. You can change the
issue
date as any previous
date when data entry is failed on that day (when a situation might come as
operating system
problems, electricity problems etc.). Video
list will list the videos that are taken by
the customer. The
following are the other provisions while issuing.
§
Issue Offer: It is
used to issue the free video.It will be disabled if you are not offering it.
You can set up free offer in the Setup menu. See help on Setup. If your customer’s total rental is greater than or equal
to the number you specified as rent x, the issue offer become enable. Select
the video which you given as free. The button will be enabled up to issue of
total number of free videos you
specified in the Setup. If you set it as rent 3 videos get 1 free, customers
who get 6 videos can have 2 free videos. So issue offer button will be enabled
for two issues. It will be disabled after that.
§
Accept Payment: This
option will help you to skip or enable all payment process. According to the
nature of your business you can use this option.
§
Apply Tax: You can apply or disable tax. When you disable Tax,
the tax rate will cut off from the actual amount. If you apply it, it will add
the rate of tax with actual amount. See changes on new balance while accessing
this option
§
Disable Special rate: By clicking this option, you can enable or
disable the special rate. If you enable the special rate it will cut
off/add amount according to the percentage of special rate on that day.
If you disable, it will become actual amount. See changes on new balance while
accessing this option.
§
Give discount: By clicking this option you can give discounts to
your customer, friends and relatives. Specify the discount in money in the text
box. See changes on new balance while accessing this option.
§
Print receipt: You can print receipt. Just click on it. If it
is checked it will take print out when OK button is pressed.
§
Disable Reservation: If you are issuing the videos which are
reserved, it will cause to apply reservation charge specified in the Rental
rates in the rate option on Setup. You have any desire to disable it, just
click to make it check. See changes on new balance while accessing this option.
o
Payment:
§
Previous Balance: This will display the balance of the
customer. If it is a negative value (Eg: -110), the customer has to pay that
much amount. If the amount is a positive value (Eg: 110), then you have to pay
that much amount to your customer.
§
Cost of the Rental: It displays the total amount of rental
§
New balance: It will display the new balance after the
calculation with previous balance. If it is a negative value (Eg: -20),
payments of the customer is in pending. If it is a positive value (Eg: 20), you
have to pay the amount to your customer. The new balance will change according to changes in the amount paid.
§
Amount paid now: You
can enter the amount paid by the customer in this box. While entering, the new
balance will change.
§
Paid By: This option
will help you to specify the customer payment type.
o
To add a video in this list using this window, just click on the ADD
button. It will display the video selection window. Procedures are same as
written above.
o
You can remove the video, which is selected by the customer. Select the
video in the video list. Just by clicking on the Delete button, you can implement it.
Click Issue when all the procedures are completed. If the paid amount is either
less than the balance or greater than the amount, it will display a message
whether the due amount has to be added to the customer balance account or not.
If you choose Yes, VideoManager will keep this balance. If you don't want to
keep it in customer balance account or you have made any error you can choose
No.
Receive
This menu is used for receiving Videos from the customer. When the user clicks
the Receive menu a dialog box will be shown as in the Fig 58 which contains the
receive video number to be entered.
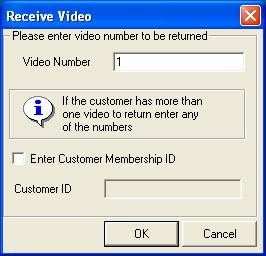
Fig 58.
Enter Video ID
Upon
entering the number and pressing OK, a dialog box will show the videos taken by
this customer and not returned, with the current
video in the right side. The dialog box is as shown in Fig 59.
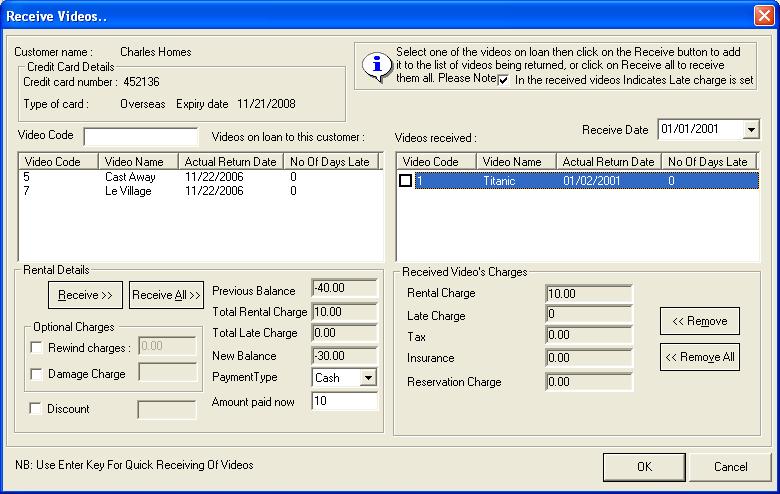
Fig 59. Receive Videos
Provision is there for paying the amount, charging rewind charge, giving
discount, charging damage charge, viewing individual video rental details etc.
Select all the videos to be returned by the customer, enter the amount paid and
click OK button. The issued videos are received by the owner.
Reserve
This
menu gives the option to reserve the videos. For this, first select the
customer from the window below in Fig 60.
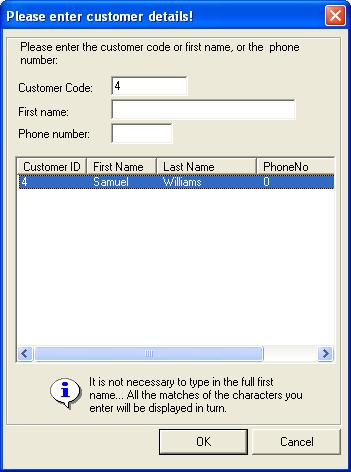
Fig 60. Selecting a video for Reservation
After selecting a customer, press the OK button, then you will get a
confirmation window as shown in Fig 61.
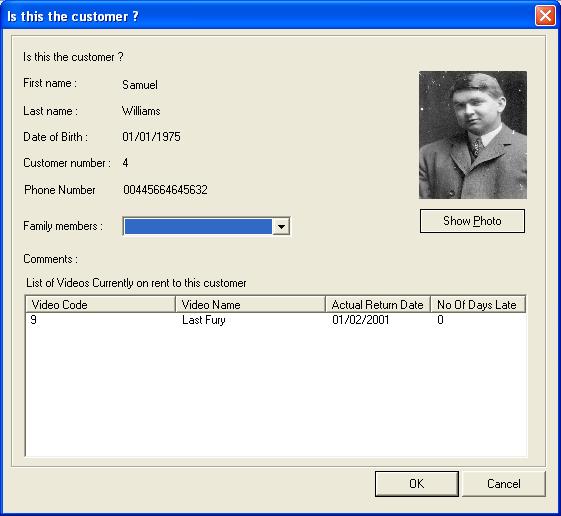
Fig 61. Confirming the Customer
If
you press the OK button, a message box will
appear indicating that the customer has to make due returns (if any) and
asking whether you have to make reservation for this customer.
If
you press OK, you will get another window from which you can select the video
that is to be reserved. There is also option for specifying the period of
reservation and the date at which the video will be taken by the customer.
This window is as shown in Fig 62.
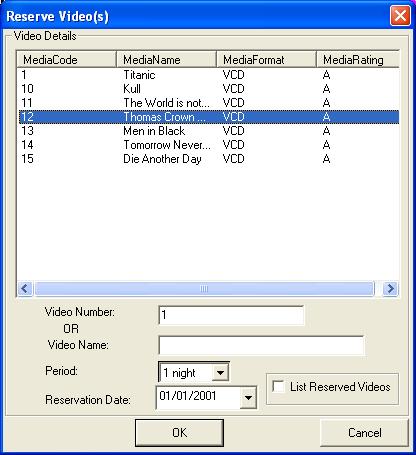
Fig 62. Selecting the Video For Reservation
If
you press the OK button, you can select another video. If you have finished
making the reservation, press the ‘Enter’ and you will get the list of
videos that are reserved. This window is as shown in Fig 63.
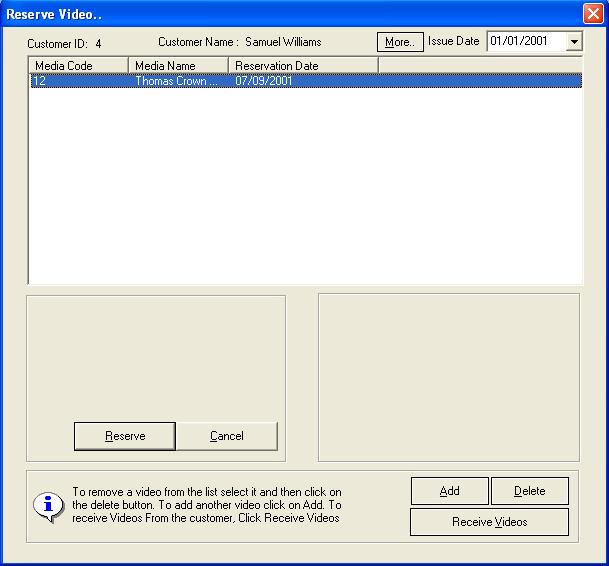
Fig 63. Making the Reservation
If
you press the ‘Reserve’ button, the videos will be reserved. If you do not
want to reserve, you can press the Cancel button. This also contains the
provision for adding and deleting the reserved videos.
Cancel Reservation
This
menu allows you to cancel a reserved video. For this, you have to make a
selection from the following
window. The window contains the details of the reservation like customer ID,
customer name, the details regarding the reservation like reservation date,
video names etc. The window is as shown in Fig 64.
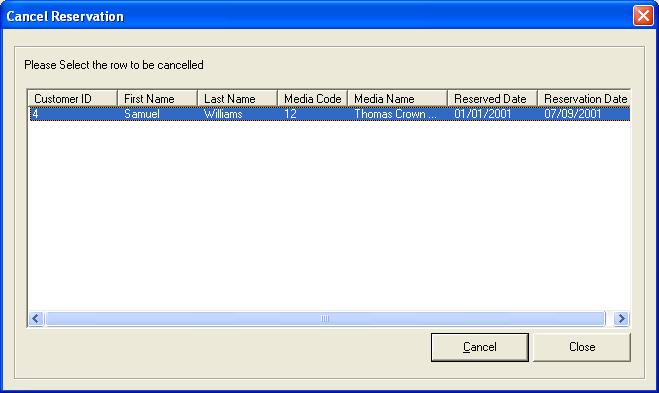
Fig 64. Canceling the Reservation
If
you press the ‘Cancel’ button, you will get a message box asking “Are you
sure you want to cancel the reservation item”. If your answer is Yes, that
item will be cancelled from the reservation list. If your answer is No, the
item will remain in the list. If you press the ‘Close’ button in the above
window you will escape from this window.
Cancel Old Issue
This
menu is useful when the item that was issued is a damaged one or is not
readable. This menu is used to cancel those orders. For this, you will get a
window containing issue number, customer ID, customer name etc. The window will
be as shown in Fig 65.
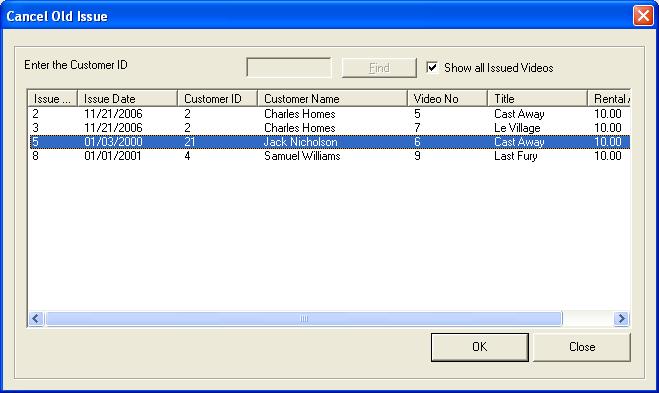
Fig 65. Selecting the issue for Cancellation
After selecting an item from the above list press the OK button. A message box
will appear asking “Are you sure you want to cancel the issued item”. If
your answer is Yes, another message box will appear “Issued item is cancelled
and customer balance is updated”. If your answer is No, you will see the
window above. If you press the ‘Close’ button in the above window, you will
escape from the above window.